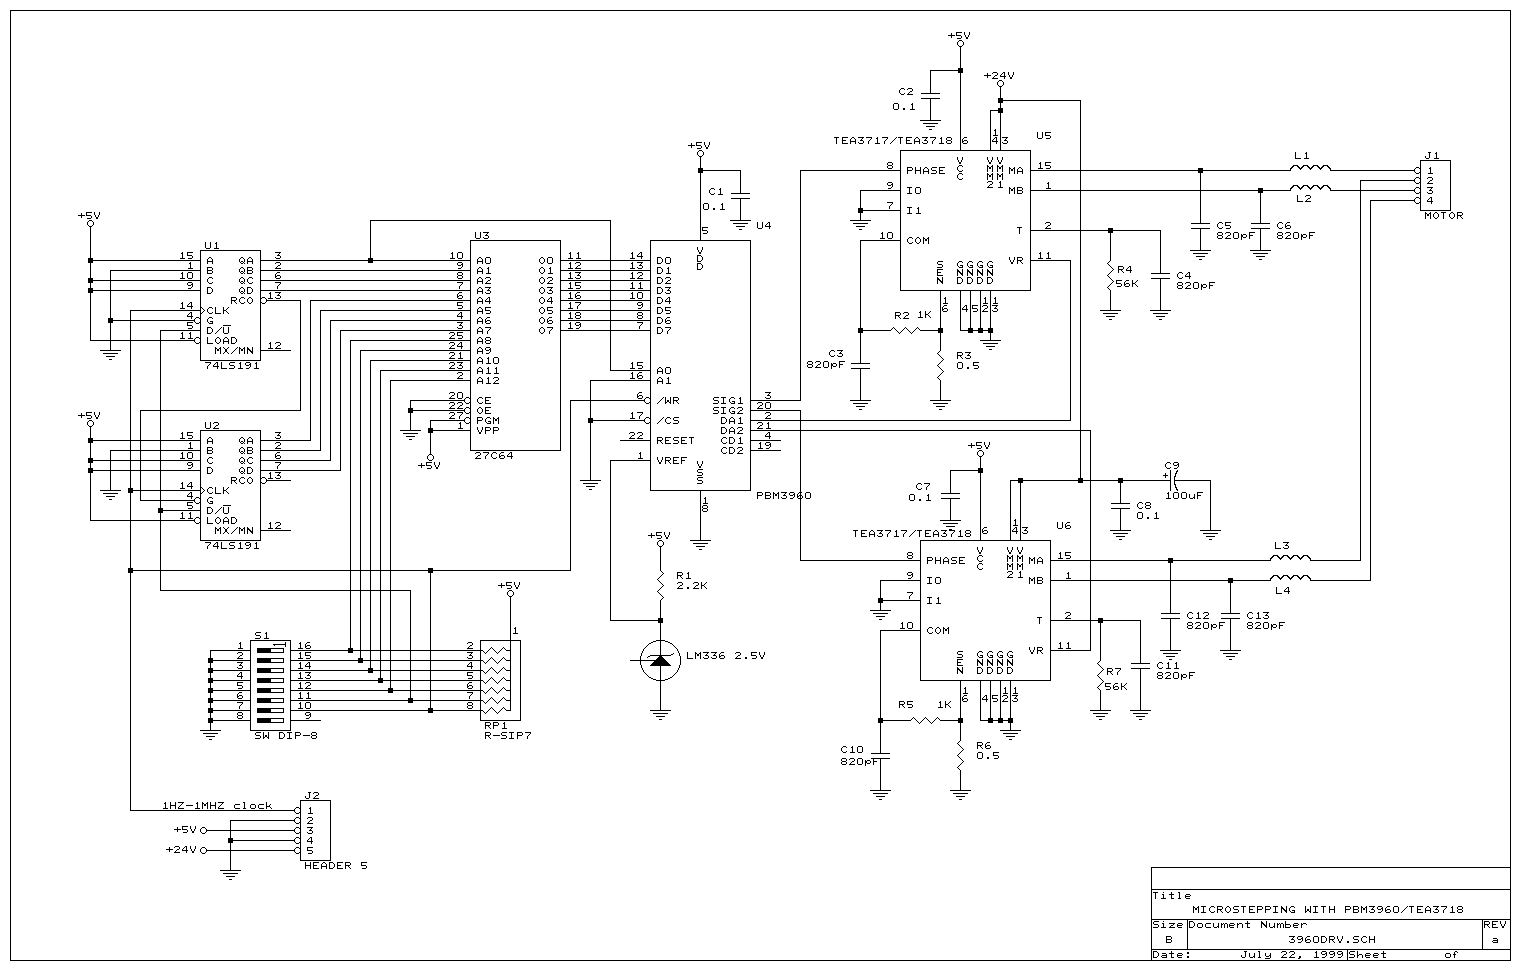
Microstepping stepper motor driver with PBM3960 and TEA3718
For additional
information and resources see the
Links
below...
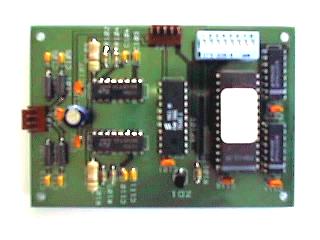
click image to enlarge
Introduction
This Microstepping motor driver offers a short cut to get familiar with microstepping. It
is a complete system to driver the bipolar stepper motor in micro-stepping
mode as well as the half step and full step modes. This board is built
around the Ericsson
PBM3960
(NJR NJU39610) microstepping controller and
TEA3718
stepper motor driver.
Functional description
The microstepping motor driver circuit can be divided into three functional blocks, Microprocessor
simulation logic, microstepping controller and stepper motor driver.
A. Micro-stepping simulation.
This block send the control signals normally sent by a microprocessor to
the microstepping controller, the inputs to the block are the 5
Dip-switches and the clock pulse from pin1 of J2. During normal operation
the current level in one of the stepper motor windings is updates at every step
pulse (single pulse programming). These mean two step pulses are required to
update both winding currents and make the stepper motor turn. Operating the
dip-switched S1-6 can change the direction of the stepper motor rotation
An eight bit counter, built up of two four bit counters U1 and U2
(74LS191), generates a 256 step sequence at their outputs. This is sent as
an eight bit wide address (A0-A7) to the EPROM U3 (27C64). The counter
increments or decrements (depends on S4 setting) the address at every
positive transition on the step pulse. When the EPROM input address A0 is
low the EPROM outputs data associated to driver channel 1. When A0 is high
data associated to driver channel 2 is output from the EPROM. This means
that 128 consecutive 2 byte entities in the EPROM make up one micro-step
cycle, which is equivalent to 4 full steps. The Dip-switches S1-1 to S1-3
are directly connected to EPROM address A8, A9, and A10. This makes it
possible to select 8 different micro-step sequences (blocks) without
changing the EPROM contents.
B. Microstepping controller
This block converts the digital signals from the EPROM into two analog
signals VR1 and VR2, which control the current levels in the two motor
windings. It also generates the digital signals SIGN1 and SIGN2 to control
the direction of the current in the windings.
Refer to
PBM3960
microstepping driver
data sheet for more information.
C. Stepper motor driver
.
The stepper driver controls the winding currents in accordance to the analog and
digital input signals. The current control is switch mode constant current
(chopper) to minimize power losses. The chopping is controlled by a fix
frequency PWM method. The driver is implemented with the TEA3718 or PBL3718
stepping motor driver. Refer to
TEA3718 stepper motor driver data sheet for more information.
Modified the current wave forms
By changing the data stored in the EPROM it is possible to generate
different current waveform. For instance it is possible to modify the
sine/cosine curves to get minimum micro-stepping position ripple. It is also
possible to generate micro-stepping sequences with other step lengths. The
following lengths are possible 1/32(default micro-step), 1/16, 1/8, 1/4,
1/2, and full step. For all sequences all the 128 2 byte entities of the
EPROM have to be programmed due to the 8 bit counter driving the EPROM. It
is good idea to stretch all sequences to 128 step sequences to get the same
motor speed independently of the step length. This is done by repeating
every 2-byte entity 2, 4, 8, 16 or 32 times when not 1/32 stepping mode is
used.
The 2 byte entities contain the two 7 bit DA register data and 1 bit sign
data for the two DAC in the PBM3960. DAC1 data is stored on even addresses
and DAC2 data on odd addresses. Bit0 -6 set the amplitude of the current and
bit7 sets the sign.
One data block stores one sequence and occupies 256 consecutive addresses
in the EPROM. It is possible to access 8 different blocks with the
Dip-switches S1-3 setting. More blocks can be used if needed by utilize the
addresses A11 and A12.
Quick
Start
To run the board you
need the following things, One pulse generator, 1HZ ~1MHZ, with TTL output
levels. One +5V power supply, capable of delivering 200mA. One power supply
for the motor voltage, preferable variable output from 10 to 40VDC,maximum
output current 1Ampere or more. A bipolar stepper motor with rated current
less than 1Ampere and rated voltage less than 20V. The nominal drive current
is 415mA, with a simple modification on the value of the current sensing
resistors you can adapt the board for any current up to an ampere.
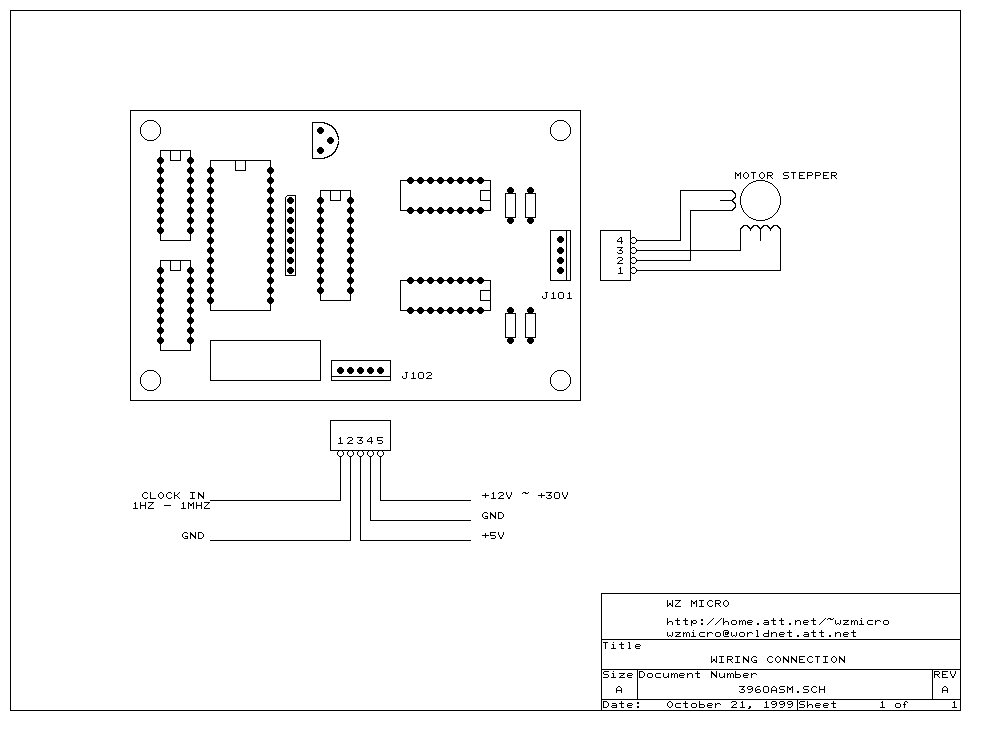
Make sure the power
supplies off. Connect the motor, power supplies and pulse generator to the
board. Check that all connections are OK. Turn the power on in the following
order. First +5V supply, then motor supply and last pulse generator. Change
the pulse generator frequency to examine the motor behavior at different
stepping frequencies. The direction of rotation can be changed with the
DIP-switch S1-6.
Micro-stepping greatly
improves stepping at low frequencies and in most case also at frequencies
around the system resonance frequency.
See Table 1 EPROM address
setting for selecting the difference stepping modes. First try to run the
motor at full step with low frequency, 250HZ for instance (this corresponds
to approximately 4HZ per step). Notice the rotor movement, and then change
to the half step mode, finally switch to the micro-stepping. That clearly
shows the benefits of using micro-stepping when running a stepper at low
frequencies. No matter how low the frequencies you set, there will be less
noise problems with micro-stepping. This is due to the low amount of energy
transferred to the motor per micro-step.
To achieve the smoothest
possible micro-step movements at the lowest frequencies it is almost always
necessary to develop a customized Sine/Cosine current profile. The profile
compensates for the motor sine/cosine deviation. If micro-stepping position
ripple is of less importance and micro-stepping is used only for reduction
of noise then the standard sine/cosine profile usually does the job. The
EPROM on the board contains in addition to the standard profile two
customized sine/cosine profiles.
Run the motor at a very
low frequency 50HZ, for instance. Set the standard sine/cosine profile and
observe the rotor movement. Use a pointer to observe the movement more
clearly. If the velocity ripple is too large for the actual application,
then use a more micro-stepping adapted motor or develop a customized
sine/cosine current profile. Switch to the modified sine/cosine profiles to
see if this improves the movement. Refer to the micro-stepping application
note for more information.
Table 1 EPROM address setting.
|
Block |
S1-5 |
S1-4 |
S1-3 |
S1-2 |
S1-1 |
Description |
| 0 |
ON |
ON |
ON |
ON |
ON |
Standard 1/32 step |
| 1 |
ON |
ON |
ON |
ON |
OFF |
Modified Sine/Cosine 1 |
| 2 |
ON |
ON |
ON |
OFF |
ON |
Modified Sine/Cosine 2 |
| 3 |
ON |
ON |
ON |
OFF |
OFF |
Full step mode |
| 4 |
ON |
ON |
OFF |
ON |
ON |
Half step mode |
| 5 |
ON |
ON |
OFF |
ON |
OFF |
These blocks can be used
for customized application specific Micro-stepping |
| Use for customized
sequences |
- |
- |
- |
- |
- |
| 31 |
OFF |
OFF |
OFF |
OFF |
OFF |
The following is a sample of 1/32 step sequence:
$000000,7F 06 7E 0C 7E 13 7D 19 7B 1F 7A 25 78 2B 75 31
$000010,73 36 70 3C 6D 41 6A 47 66 4C 62 51 5E 55 5A 5A
$000020,55 5E 51 62 4C 66 47 6A 41 6D 3C 70 36 73 31 75
$000030,2B 78 25 7A 1F 7B 19 7D 13 7E 0C 7E 06 7F 00 7F
$000040,86 7F 8C 7E 93 7E 99 7D 9F 7B A5 7A AB 78 B1 75
$000050,B6 73 BC 70 C1 6D C7 6A CC 66 D1 62 D5 5E DA 5A
$000060,DE 55 E2 51 E6 4C EA 47 ED 41 F0 3C F3 36 F5 31
$000070,F8 2B FA 25 FB 1F FD 19 FE 13 FE 0C FF 06 FF 00
$000080,FF 86 FE 8C FE 93 FD 99 FB 9F FA A5 F8 AB F5 B1
$000090,F3 B6 F0 BC ED C1 EA C7 E6 CC E2 D1 DE D5 DA DA
$0000A0,D5 DE D1 E2 CC E6 C7 EA C1 ED BC F0 B6 F3 B1 F5
$0000B0,AB F8 A5 FA 9F FB 99 FD 93 FE 8C FE 86 FF 80 FF
$0000C0,06 FF 0C FE 13 FE 19 FD 1F FB 25 FA 2B F8 31 F5
$0000D0,36 F3 3C F0 41 ED 47 EA 4C E6 51 E2 55 DE 5A DA
$0000E0,5E D5 62 D1 66 CC 6A C7 6D C1 70 BC 73 B6 75 B1
$0000F0,78 AB 7A A5 7B 9F 7D 99 7E 93 7E 8C 7F 86 7F 80
$000100
.
.
.
.
$0007FF
Click
here to download the
project file in PDF format
 the whole KIT which includes all the components and PCB for just
$50.00
plus shipping/handling.
preprogrmmed
27C64 EPROM for only $10.00
The preprogrammed 27C64 with standard
1/32 step sine/cosine, half step, full step, modified sine/cosine sequences
and all other parts can be purchased from us. If you need help or have any
comments on this project, please send it to
order@wzmicro.com
 Back to Projects Page
View other projects:
View

Motor Driver Boards
|
Z80 Boards
|
Motor
Integrated Circuits
|
Passive components |
Miscellaneous |
RF transmitter/Receiver
| CCD Camera / Module

![[Under Construction]](images/undercon.gif)